

Registration and work with Linked Server of MSSQL 2012
Test environment
Preparing to configure a linked server
2. Install the InterBase/Firebird client to a MSSQL server
3. Check if the provider and server client have been installed correctly
4. Check the database you connect
5. Configure the distributed transactions coordinator (MSDTC)
2. Connect to the MSSQL on which the linked server will be configured
3. Configure the use of OLE DB provider
4. Create a linked server
Working with a linked server from «Microsoft SQL Server Management Studio»
Data sampling using automatic transaction
Data sampling using parameters
Data modification
Inserting a new row
Updating a row
Deleting a row
Executing a script
Creating VIEW based on linked server
Calling a stored procedure
Executing a stored procedure that returns a set
Executing a stored procedure that returns OUT parameters
Executing a query through statement «EXEC AT»
Transaction isolation levels
Working in a transaction with the «READ COMMITTED» isolation level
Working in a transaction with the «REPEATABLE READ» isolation level
Introduction
In this article, we will step by step explain all the stages of the registration of a linked MSSQL 2012 server with a Firebird/InterBase database and how to work with it.
Test environment
- MSSQL 2012 Express R2 x64 (English). Windows Server 2008 R2 x64 (Russian) with English UI.
- Firebird 2.5.3.26709 x64 SuperClassic.
- Test database: employee.fdb (dialect 3) from the FB2.5 package
Preparing to configure a linked server
1. Install IBProvider to a MSSQL server
Use installers of the correct bitness:
- For 64-bit MSSQL, install 64-bit IBProvider
- For 32-bit MSSQL, install 32-bit IBProvider
Recommendations:
- In case of 64-bit operating system, we strongly recommend that you install both 32-bit and 64-bit provider.
- We do not recommend that you use IBProvider Lite when working with MSSQL.
- Install «Samples» and «Binaries of examples» as well – you will need them when checking your FB/IB database. You can deinstall them later.
2. Install the InterBase/Firebird client to a MSSQL server
Modules with server clients:
| 32-bit client | 64-bit client | |
| InterBase | gds32.dll | ibclient64.dll |
| Firebird | fbclient.dll (32-bit version!) | fbclient.dll (64-bit version!) |
You can find these DLLs in the distribution kits of your InterBase/Firebird server.
Pay attention that server clients use additional DLLs of Visual C++. You can download the setup files of Microsoft Visual C++ Redistributable Package from the IBProvider web site.
Client installation options
1. Copy the DLL to Windows system directory.
| System directory for 32-bit DLLs | System directory for 64-bit DLLs | |
| 32-bit Windows | C:\Windows\System32 | |
| 64-bit Windows | C:\Windows\SysWOW64 | C:\Windows\System32 |
2. Copy the DLL to a separate directory.
An example for 64-bit InterBase client:
- Create a directory on a non-system disc (for example) d:\InterBaseClient\64bit
- Copy ibclient64.dll to this directory
- Check access permissions (on the file system level) for ibclient64.dll
3. Check if the provider and server client have been installed correctly
If you do not have experience in installing and configuring IBProvider and server client to work with InterBase/Firebird, it makes sense to check stage (1) and (2) without participation of MSSQL.
Example of a check for Windows 2008 R2 64bit
On a computer with MSSQL, create the file «test_connection.vbs» with the following VBS script:
option explicit

dim cn

set cn=createobject("ADODB.Connection")

cn.Provider="LCPI.IBProvider.3"

'fbclient.dll from system directories of Windows (System32/SysWOW64)
cn.ConnectionString _
 ="location=HOME2:e:\database\employee.fdb;" & _
  "user id=sysdba;" & _
  "password=masterkey;" & _
  "dbclient_library=fbclient.dll;" & _
  "dbclient_library_64=fbclient.dll"

on error resume next

call cn.Open()

if(err.number<>0)then
 errorFlag=true

 wscript.echo "ERROR: ["&err.Source&"] "&err.Description

 dim e,n

 n=0

 for each e in cn.Errors
  n=n+1
  wscript.echo "["&n&"] "&e.Source&" - "&e.Description
 next 'e

 call wscript.quit(1)
end if

on error goto 0

wscript.echo "Provider: "&cn.Properties("Provider Name").Value&" "&cn.Properties("Provider Version").Value

wscript.echo "OK!"

call wscript.quit(0)
NOTE: the connection string must contain your values of the properties «location», «user id», «password» and «dbclient_library». The description of all initialization properties can be found here.
Run your file «test_connection.vbs» from the console (cmd.exe).
Testing of the 64-bit database access:
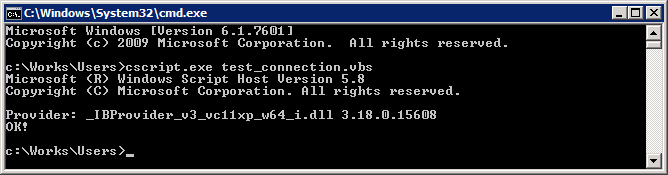
Testing of the 32-bit database access:
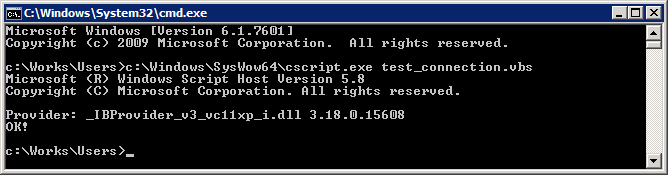
Make this script work without errors.
4. Check the database you connect
Before you connect your FB/IB database to MSSQL, you need to ensure that its system tables are error-free.
Otherwise IBProvider or MSSQL may refuse to work with your database.
IBProvider distribution package contains the VBS script «prog_check_system_tables.wsf» that finds a portion of the known errors.
The script is located in the following directory: «<ProgramFiles>\LCPI\IBProvider.3\TestCode\ActiveX\IBP\test_system\prog»
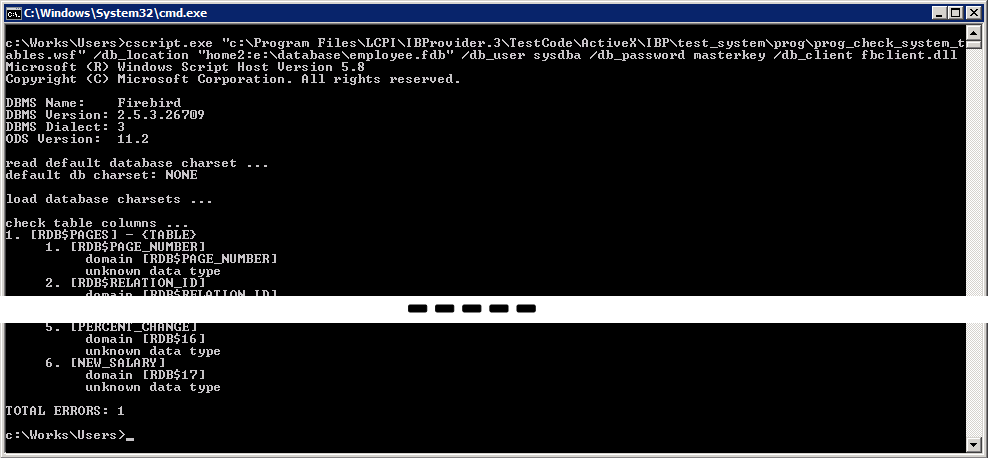
The script can be run from the console (cmd.exe) via «cscript.exe».
The run parameters that will be indicated for our database check:
In the test base employee.fdb, which we will connect to MSSQL, this script found one error:
The main result of the script work is two files «check_system_table.log» and «check_system_table.sql».
Let’s find the error description in «check_system_table.log»:
|
46. [EMPLOYEE] — {TABLE} 1. [EMP_NO] domain [EMPNO] already processed ……… 10. [SALARY] domain [SALARY] already processed 11. [FULL_NAME] domain [RDB$9] VARCHAR charset_id: 0 charset_name: [NONE]
|
FULL_NAME is a calculated text column. For some obscure reason, the number of characters is not defined in the description of this column.
The generated file «check_system_table.sql» offers the error-correcting script:
|
/*1 ——————————— */ /* VARCHAR DOMAIN USED AT {TABLE}[EMPLOYEE].[FULL_NAME] CSET_NAME : [NONE] CSET_ID : [0] BYTES_PER_CHAR : [1] FIELD_LENGTH : [37] CURRENT CHAR_LENGTH: [0] */ UPDATE RDB$FIELDS SET RDB$CHARACTER_LENGTH=37 WHERE RDB$FIELD_NAME= (SELECT RDB$FIELD_SOURCE FROM RDB$RELATION_FIELDS WHERE RDB$RELATION_NAME=’EMPLOYEE’ AND RDB$FIELD_NAME=’FULL_NAME’) AND RDB$CHARACTER_LENGTH=0; /* ——————————— */ COMMIT; /**/ |
Let’s study carefully the generated queries to fix the database and apply this script to our database (for example via IBExpert).
Again, we run prog_check_system_tables.wsf. This time, the script does not find any errors. But it does not mean that there are no errors there. During the linked server operation, other problems may come out.
- In the case of your database, the things can be much more complicated.
- Practice on a test database first.
- We recommend that you make a COMPLETE backup of your database before fixing errors.
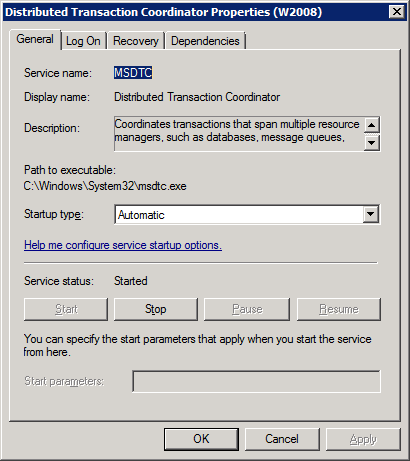
5. Configure the distributed transactions coordinator (MSDTC)
To execute queries via a linked server, you need a continuously running MSDTC service.
- Open the service management console on the MSSQL server.
- Find the coordinator service.
- Enable its automatic start and start it.
Configuring linked server
1. Start SQL Server Management Studio
2. Connect to the MSSQL on which the linked server will be configured
3. Configure the use of OLE DB provider
Find IBProvider in the list of available providers. If you don’t find it there, try to refresh the list. If it doesn’t help, it means that you made an error during the first stage.
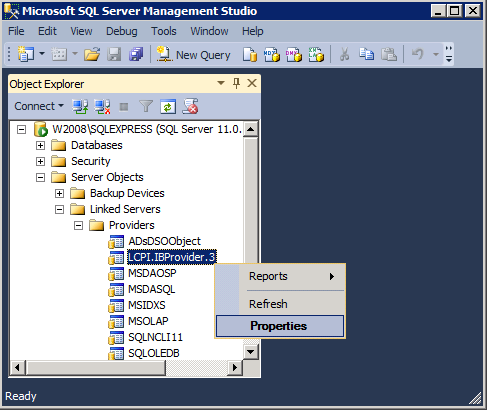
Open the properties configuration dialog:
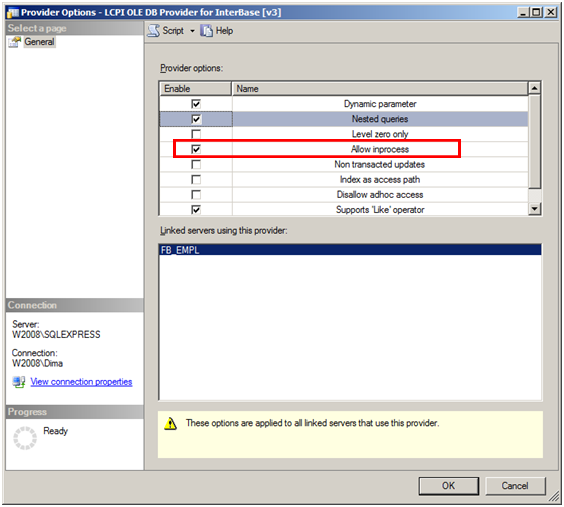
Tick the following boxes:
- Dynamic Parameters
- Nested queries
- Allow In Process (must!)
- Supports ‘Like’ operations
Close the dialog (OK).
4. Create a linked server
Proceed to «Linked Servers» and select «New Linked Server…» from the menu:
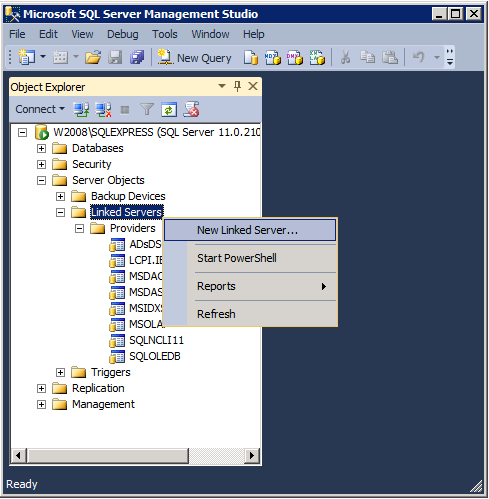
The linked server configuration dialog will open.
Fill in the fields on the main settings page.
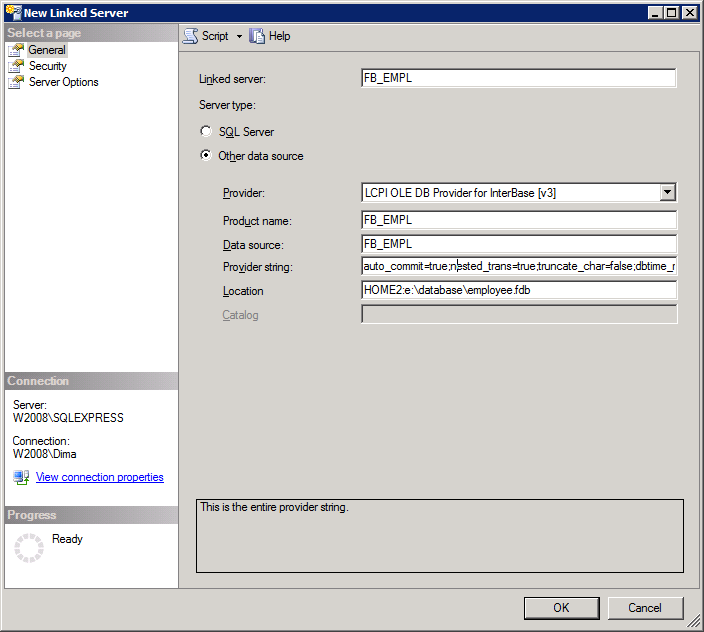
«Linked Server»
The name of the linked server that will be used in queries. In our case, it will be FB_EMPL.
Provider
Select «LCPI OLE DB Provider for InterBase [v3]».
«Product Name», «Data Source»
Enter any text into these fields. In our case, we will duplicate the linked server name – FB_EMPL.
«Provider String»
Here we define properties that configure the work of the provider. Recommended settings:
| Property | Value | Note |
| auto_commit | true | Allow automatic start and commit of transactions. |
| nested_trans | true | |
| truncate_char | false | |
| dbtime_rules | 1 | Only for MSSQL 2008 and 2012. |
| support_odbc_query | true | |
| asynch_fetch | 2 | Only for MSSQL 2005, 2008 and 2012. Use it to speed up loading of large sets. |
| dbclient_library | gds32.dll ibclient64.dll fbclient.dll |
Enter the name and full path to the server client DLL. |
| ctype | Enter the name of the charset for your database text data. | |
| ctype_none | For the databases created using the charset NONE. Specify the charset of your text data. | |
| schema_ldr_cfg__check_constraints | 0 | We disable publication of data on CHECK-restrictions in metadata schemas. |
| schema_ldr_cfg__descriptions | 0 | We disable publication of object descriptions in metadata schemas for avoiding error with code 8152. |
| ignore_err_param | 4 | We ease the check of query parameters. We need it to run stored procedures. |
In our case, the connection string looks as follows:
If you want to connect to Firebird without fbclient.dll, use following connection string:
You may check your connection string with the test script from «Checking the correctness of the provider and server client installation».
«Location»
The path to the database you connect. In our case, the database is located on server HOME2 in the file «e:\database\employee.fdb»:
When connecting to Firebird without using fbclient.dll (connection string contains «dbclient_type=fb.direct»), it makes sense to specify the type of connection protocol and version of TCP/IP:
This will speed up the process of connecting in networks with simultaneous support for TCP/IP v4 and v6.
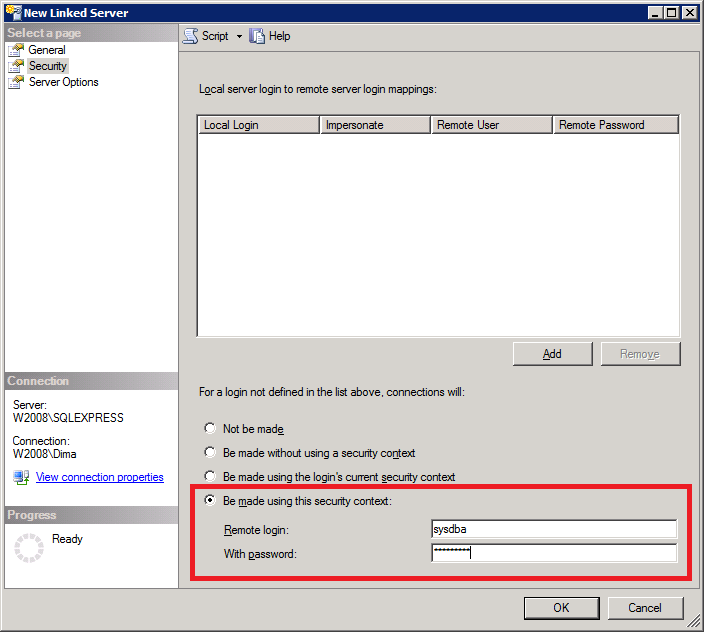
Switch to the «Security» page and enter login and password for connection to the database:
Switch to the «Server Options» page:
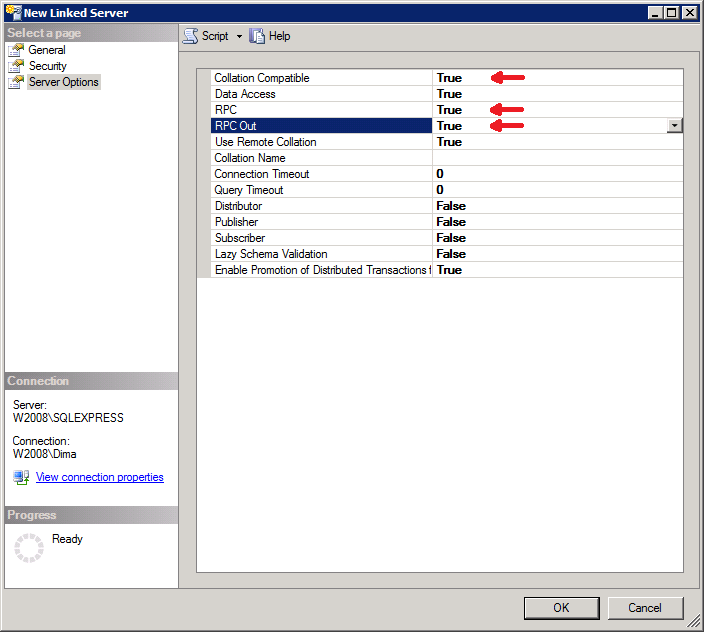
We recommend that you set the following properties:
- «Collation Compatible»=true
- «RPC»=true
- «RPC Out»=true
Configuration of the linked server is now finished – press OK.
If everything has been configured correctly, the linked server will be created and appear in the object tree:

General rules for working with Linked Server
1. In SQL queries, executed via a linked server, table and column names should be typed in the upper case. Accordingly, in your Firebird/InterBase database, the names of all objects with which you will work via the linked server must be in the upper-case.
2. To simplify the code, the default level of transaction isolation will be used: read_committed.
Working with a linked server from «Microsoft SQL Server Management Studio»
Press «New Query» to proceed to the window for SQL scripts editing and running.
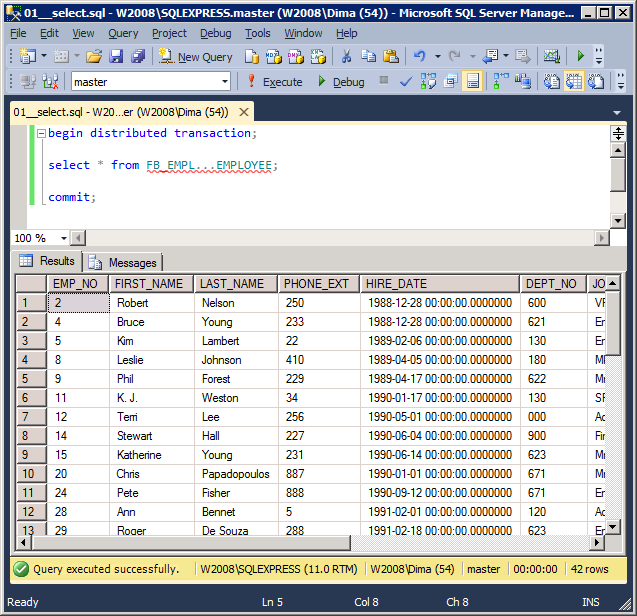
Data sampling query using explicit transaction
begin distributed transaction;

select * from FB_EMPL...EMPLOYEE;

commit;
The result of work:
If we remove «schema_ldr_cfg__check_constraints=0» from the connection string, the query to the table EMPLOYEE will generate the following message:
|
Msg 1046, Level 15, State 1, Line 1 Subqueries are not allowed in this context. Only scalar expressions are allowed. Msg 102, Level 15, State 1, Line 8 Incorrect syntax near ‘)’. (42 row(s) affected) |
This is because when preparing a query MSSQL requests various information from IBProvider about the table EMPLOYEE. This includes receiving of information on the CHECK-restriction that causes this message:
salary >= (SELECT min_salary FROM job WHERE
                        job.job_code = employee.job_code AND
                        job.job_grade = employee.job_grade AND
                        job.job_country = employee.job_country) AND
            salary <= (SELECT max_salary FROM job WHERE
                        job.job_code = employee.job_code AND
                        job.job_grade = employee.job_grade AND
                        job.job_country = employee.job_country)
|
When we specify «schema_ldr_cfg__check_constraints=0» in the connection string, we completely exclude the data on CHECK-restrictions from metadata schemas. Thus, we completely eliminate the reasons for such messages.
Data sampling using automatic transaction
Because we have «auto_commit=true» in our connection string, we may omit the explicit start and commit of the transaction.
select * from FB_EMPL...EMPLOYEE;
The result of the query will be the same – 42 rows.
The isolation level of an automatic transaction is defined in the initialization property «auto_commit_level».
Data sampling using parameters
begin distributed transaction;

declare @first_name as varchar(32);

set @first_name='Scott';

select * from FB_EMPL...EMPLOYEE empl where empl.FIRST_NAME=@first_name;

commit;
The result of work:

Data modification
When executing the SQL queries INSERT, UPDATE and DELETE, MSSQL tries to start a nested transaction. IBProvider implements the support of nested transactions via Firebird/InterBase savepoints. On default, this support is disabled. To enable it, enter «nested_trans=true» in the connection string.
InterBase supports savepoints starting from version 7.1.
If you work with an old FB/IB version that does not support savepoints, begin the script with:
SET XACT_ABORT ON;
Or do not apply explicit management of transactions. In the latter case, specify «auto_commit=true» in the connection string.
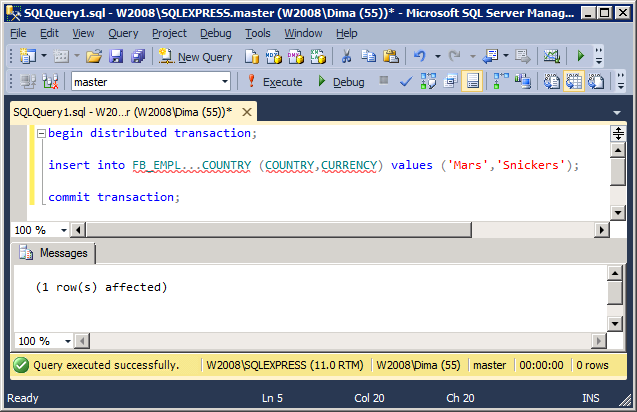
Inserting a new row
begin distributed transaction;

insert into FB_EMPL...COUNTRY (COUNTRY,CURRENCY) values ('Mars','Snickers');

commit transaction;
The result of work:
Since version 3.50, IBProvider supports DEFAULT values. This allows you to correctly execute queries like «INSERT INTO … DEFAULT VALUES».
Create a table in the test database:
CREATE TABLE TABLE6_5_DEF
(
 COL_SMALLINT SMALLINT DEFAULT 2,
 COL_INTEGER INTEGER DEFAULT 4
);
Now, execute the following queries through our linked server:
begin distributed transaction;

insert into FB_EMPL...TABLE6_5_DEF default values;

select * from FB_EMPL...TABLE6_5_DEF;

rollback;
The result of work:

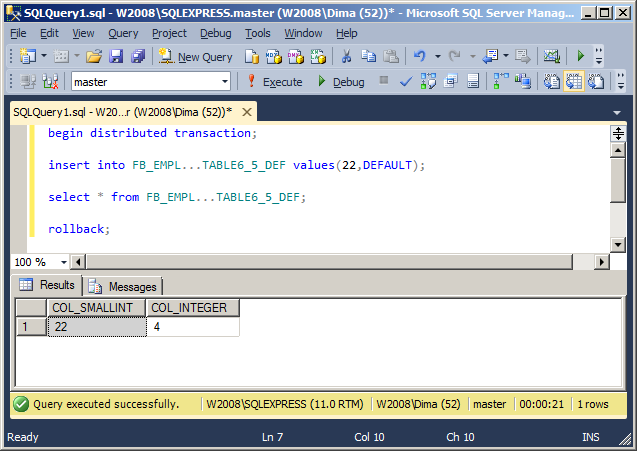
Also, since version 3.50, the keyword «DEFAULT» is correctly processed in the list of column values:
begin distributed transaction;

insert into FB_EMPL...TABLE6_5_DEF values(22,DEFAULT);

select * from FB_EMPL...TABLE6_5_DEF;

rollback;
The result of work:
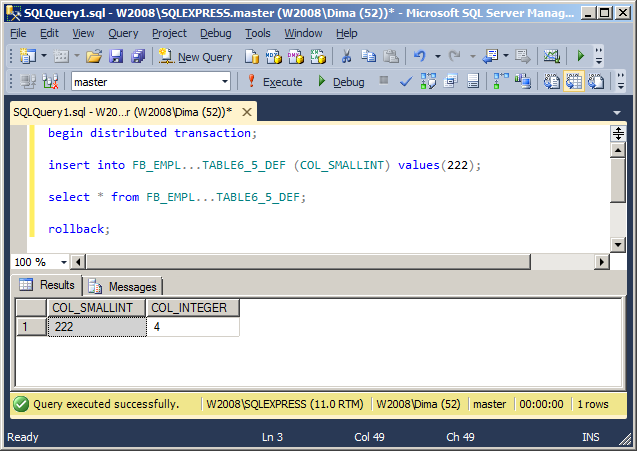
The last example, with the demonstration of support for DEFAULT values, will be a partial enumeration of the columns of the table:
begin distributed transaction;

insert into FB_EMPL...TABLE6_5_DEF (COL_SMALLINT) values(222);

select * from FB_EMPL...TABLE6_5_DEF;

rollback;
The result of work:
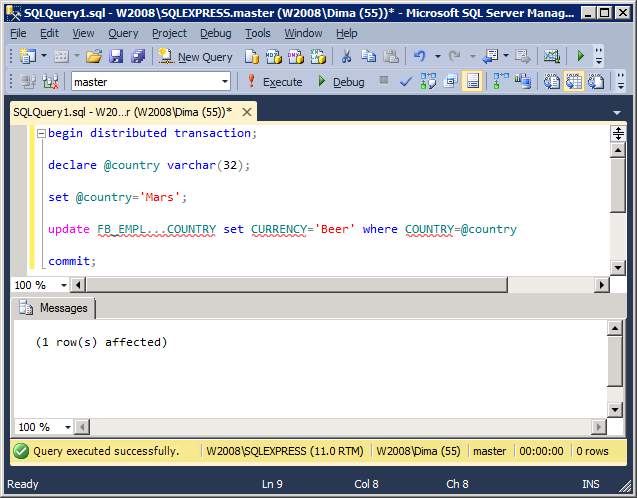
Updating a row
begin distributed transaction;

declare @country varchar(32);

set @country='Mars';

update FB_EMPL...COUNTRY set CURRENCY='Beer' where COUNTRY=@country;

commit;
The result of work:
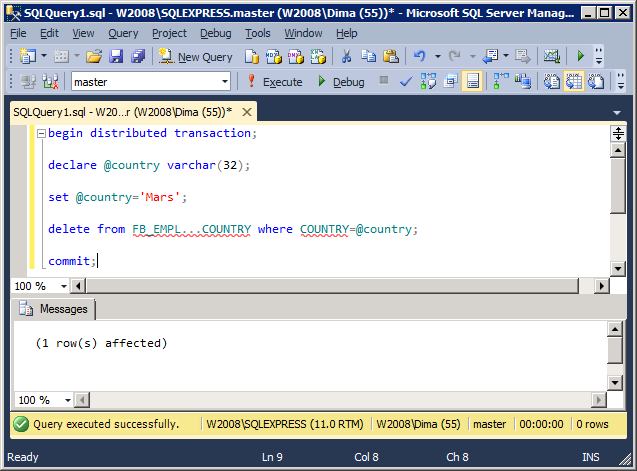
Deleting a row
begin distributed transaction;

declare @country varchar(32);

set @country='Mars';

delete from FB_EMPL...COUNTRY where COUNTRY=@country;

commit;
The result of work:
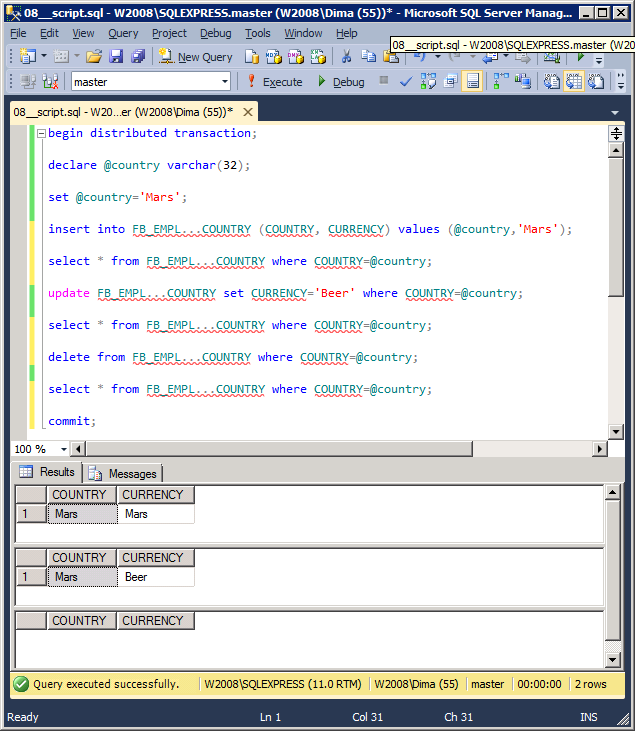
Executing a script
begin distributed transaction;

declare @country varchar(32);

set @country='Mars';

insert into FB_EMPL...COUNTRY (COUNTRY, CURRENCY) values (@country,'Mars');

select * from FB_EMPL...COUNTRY where COUNTRY=@country;

update FB_EMPL...COUNTRY set CURRENCY='Beer' where COUNTRY=@country;

select * from FB_EMPL...COUNTRY where COUNTRY=@country;

delete from FB_EMPL...COUNTRY where COUNTRY=@country;

select * from FB_EMPL...COUNTRY where COUNTRY=@country;

commit;
The result of work:
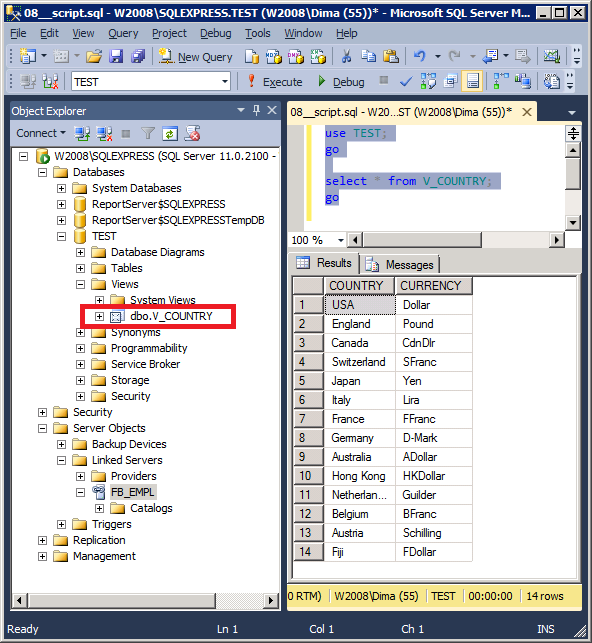
Creating VIEW based on linked server
Let’s create in the test MSSQL base (named TEST) a view for the table COUNTRY:
use TEST;
go

create view V_COUNTRY (COUNTRY,CURRENCY)
as
select COUNTRY, CURRENCY
from FB_EMPL...COUNTRY;
go
Now let’s sample from this view:
use TEST;
go

select * from V_COUNTRY;
go
The result of work:
Let’s make sure that V_COUNTRY will work within the explicit transaction:
use TEST;
go

begin distributed transaction;

insert into FB_EMPL...COUNTRY (COUNTRY,CURRENCY) values('Russia', 'Ruble');

select * from V_COUNTRY where COUNTRY='Russia';

delete from FB_EMPL...COUNTRY where COUNTRY='Russia';

select * from V_COUNTRY where COUNTRY='Russia';

commit;
The result of work:

The samplings from V_COUNTRY «see» the changes in FB_EMPL…COUNTRY.
Calling a stored procedure
FB/IB has two types of stored procedures:
- Those returning the result as a set.
- Those returning the result via OUT parameters.
In both cases, you use the unified call syntax:
EXEC name [param [,param …]];
IBProvider will do everything else for you.
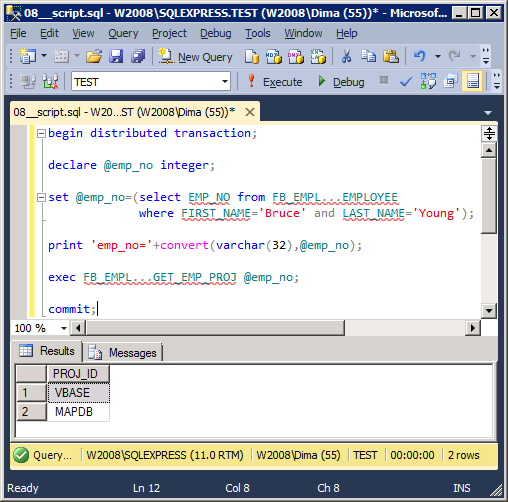
Executing a stored procedure that returns a set
There is a stored procedure in employee.fdb that returns employee’s project IDs:
CREATE PROCEDURE GET_EMP_PROJ (EMP_NO SMALLINT)
RETURNS (PROJ_ID CHAR(5))
AS
BEGIN
    FOR SELECT PROJ_ID
             FROM EMPLOYEE_PROJECT
             WHERE EMP_NO = :EMP_NO
             INTO :PROJ_ID
    DO
        SUSPEND;
END |
We will obtain the list of project for the employee «Bruce Young»:
begin distributed transaction;

declare @emp_no integer;

set @emp_no=(select EMP_NO from FB_EMPL...EMPLOYEE
             where FIRST_NAME='Bruce' and LAST_NAME='Young');

print 'emp_no='+convert(varchar(32),@emp_no);

exec FB_EMPL...GET_EMP_PROJ @emp_no;

commit;
The result of work:
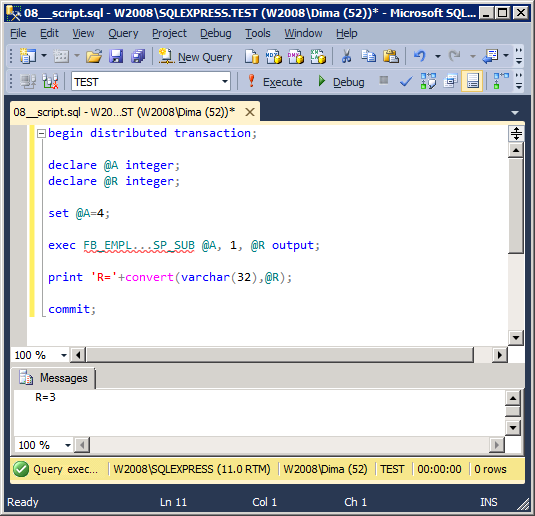
Executing a stored procedure that returns OUT parameters
There are no stored procedures returning OUT-parameters in employee.fdb. That’s why we will create our own procedure that will calculate the difference between two INTEGER numbers:
CREATE PROCEDURE SP_SUB(A INTEGER, B INTEGER) RETURNS (RESULT INTEGER) AS BEGIN RESULT=A-B; END |
We call this stored procedure via Linked Server:
begin distributed transaction;

declare @A integer;
declare @R integer;

set @A=4;

exec FB_EMPL...SP_SUB @A, 1, @R output;

print 'R='+convert(varchar(32),@R);

commit;
The result of work:
Executing a query through statement «EXEC AT»
For query to linked server, which not supported by MSSQL, you can use the EXEC statement:
{ EXEC | EXECUTE }
( { @string_variable | [ N ] 'command_string [ ? ]' } [ + …n ]
[ { , { value | @variable [ OUTPUT ] } } [ …n ] ]
)
[ AS { LOGIN | USER } = ' name ' ]
[ AT linked_server_name ]
[;]
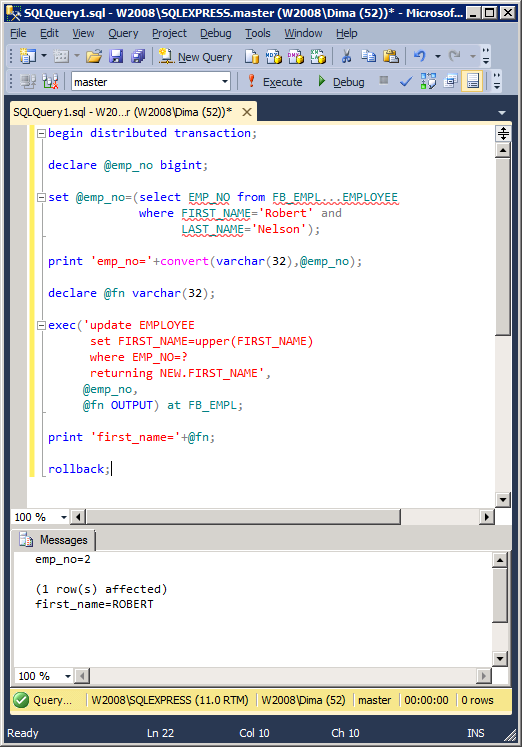
Through «exec(…) at» you can execute any queries, which are supported by IB/FB, including DDL and DML queries with parameters. For example, query «UPDATE RETURNING»:
begin distributed transaction;

declare @emp_no bigint;

set @emp_no=(select EMP_NO from FB_EMPL...EMPLOYEE
             where FIRST_NAME='Robert' and
                   LAST_NAME='Nelson');

print 'emp_no='+convert(varchar(32),@emp_no);

declare @fn varchar(32);

exec('update EMPLOYEE
      set FIRST_NAME=upper(FIRST_NAME)
      where EMP_NO=?
      returning NEW.FIRST_NAME',
     @emp_no,
     @fn OUTPUT) at FB_EMPL;

print 'first_name='+@fn;

rollback;
The result of work:
Transaction isolation levels
On default, a distributed transaction will have the isolation level READ COMMITTED. You may specify other isolation level using the command:
SET TRANSACTION ISOLATION LEVEL <isolation_level_name>;
The following isolation levels are supported for distributed transactions:
- READ COMMITTED
- REPEATABLE READ
Working in a transaction with the «READ COMMITTED» isolation level
set transaction isolation level READ COMMITTED;

begin distributed transaction;

select * from FB_EMPL...EMPLOYEE;

commit;
Working in a transaction with the «REPEATABLE READ» isolation level
set transaction isolation level REPEATABLE READ;

begin distributed transaction;

select * from FB_EMPL...EMPLOYEE;

commit;